
Table of Contents
ToggleIntroduction: Ultimate Guide to Successful Countertop Installation: 10 Crucial Steps
Are you planning a kitchen renovation or remodeling project? Perhaps you’re upgrading your bathroom countertops for a fresh look. Whatever the case may be, installing countertops is a crucial aspect of any home improvement endeavor. To ensure a smooth and successful installation process, it’s essential to follow a systematic approach. In this comprehensive guide, we’ll outline the key steps involved in a successful countertop installation, providing valuable insights and expert tips to help you achieve outstanding results.
1. Measure Twice, Cut Once:

Before diving into the installation process, accurate measurements are paramount. Take precise measurements of your countertop area, considering any irregularities or obstacles that may affect the installation. Remember, precision at this stage can prevent costly errors later on.
2. Select the Right Material:

Choosing the perfect countertop material is crucial for both aesthetics and functionality. Whether you opt for granite, quartz, marble, or laminate, each material has unique characteristics and maintenance requirements. Consider factors such as durability, stain resistance, and overall style to make an informed decision.
3. Prepare the Surface:

Prepare the existing surface by ensuring it’s clean, level, and sturdy. Remove any debris, old adhesives, or fixtures that may hinder the installation process. Proper surface preparation lays the foundation for a seamless installation and enhances the longevity of your countertops.
4. Cut and Shape:

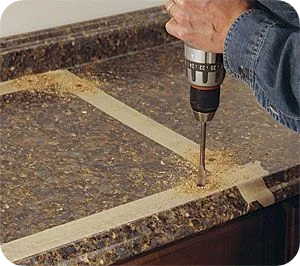
If customization is required, such as cutting the countertop to fit specific dimensions or shaping it to accommodate sinks or appliances, enlist the expertise of professionals. Precise cutting and shaping are essential for a tailored fit and a polished result.
5. Test Fit:

Before applying any adhesives or securing the countertop in place, conduct a test fit to ensure everything aligns perfectly. This step allows you to make necessary adjustments and address potential issues before proceeding further.
6. Apply Adhesive:

Once satisfied with the fit, apply a high-quality adhesive recommended for your chosen countertop material. Follow the manufacturer’s instructions meticulously to achieve optimal bonding strength and stability.
7. Secure in Place:

Carefully position the countertop in its designated location, ensuring proper alignment and support. Use clamps or braces to secure the countertop firmly in place while the adhesive sets. Pay attention to even weight distribution to prevent uneven settling or shifting.
8. Seal the Edges:

To safeguard against moisture infiltration and enhance the durability of your countertops, seal the edges thoroughly. Choose a premium sealant compatible with your countertop material and apply it evenly along the edges, taking care to seal any gaps or seams effectively.
9. Finish and Polish:

Once the adhesive has cured and the sealant has dried, it’s time to add the finishing touches. Remove any excess sealant, buff out any imperfections, and polish the surface to achieve a flawless appearance. A well-executed finish enhances the aesthetic appeal and elevates the overall look of your countertops.
10. Clean and Maintain:

Congratulations! Your countertop installation is complete. To preserve its beauty and functionality for years to come, establish a regular cleaning and maintenance routine. Follow manufacturer guidelines for cleaning products and techniques, and address any spills or stains promptly to prevent damage.
Conclusion:
A successful countertop installation requires careful planning, precision execution, and attention to detail. By following the key steps outlined in this guide, you can ensure a seamless and satisfactory outcome for your home improvement project. From accurate measurements to meticulous finishing touches, each stage is vital in achieving durable, stylish, and functional countertops that enhance your living space.
Have questions about your next renovation project? We’ve got answers. Let’s do this together.
Follow House Beautiful on Instagram.
FAQs
The duration of countertop installation varies depending on factors such as the size of the project, chosen materials, and any customization required. On average, it can take anywhere from a few hours to several days.
While some homeowners may opt for DIY installation, certain countertop materials, such as granite or quartz, often require professional expertise due to their weight and specialized handling requirements. Consulting with professionals can ensure optimal results and minimize the risk of errors.
When selecting a countertop material, consider factors such as durability, maintenance requirements, aesthetic appeal, and budget. Assessing your priorities and lifestyle needs can help you make an informed decision that aligns with your preferences and long-term goals.
Regular cleaning and maintenance are essential for preserving the beauty and functionality of your countertops. Use mild, non-abrasive cleaners and avoid harsh chemicals or abrasive scrubbers that may damage the surface. Additionally, promptly address any spills or stains to prevent them from becoming permanent.
During countertop installation, ensure proper safety measures are in place, especially when handling heavy materials or using power tools. Wear protective gear, such as gloves and safety goggles, and enlist the help of professionals for tasks that require specialized knowledge or equipment.


1 comment. Leave new
[…] Have questions about your next renovation project? We’ve got answers. Let’s do this together. […]